Solving a 2 year old problem
Logs are usually sent via UDP traffic and most commonly available as a syslog message:
- UDP: Best effort process-to-process based communication
- TCP: Reliable host-to-host based communication
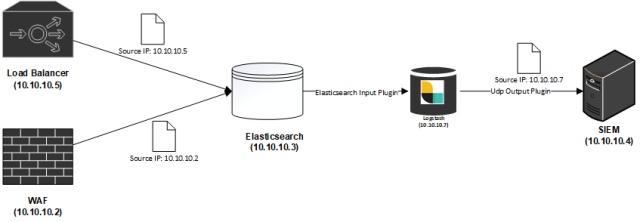
These logs in many products (especially SIEM – Security information and event management) have their sources identified using the source-IP of the packet instead of the content of the message (Often the content of the log does not contain source identification information, this is a result of poor logging design), as such in more complex topologies with log caching or staged log propagation, the source of the logs cannot differentiated by the final system.

This may not matter in a environment where the cache is only caching logs from a single device, however if the cache is centralizing logs from multiple sources, it makes it impossible for the SIEM to differentiate device sources for the logs impacting the functionality available.

This has been a ticket since 04/05/2017.
The ELK Log Forwarding Topology
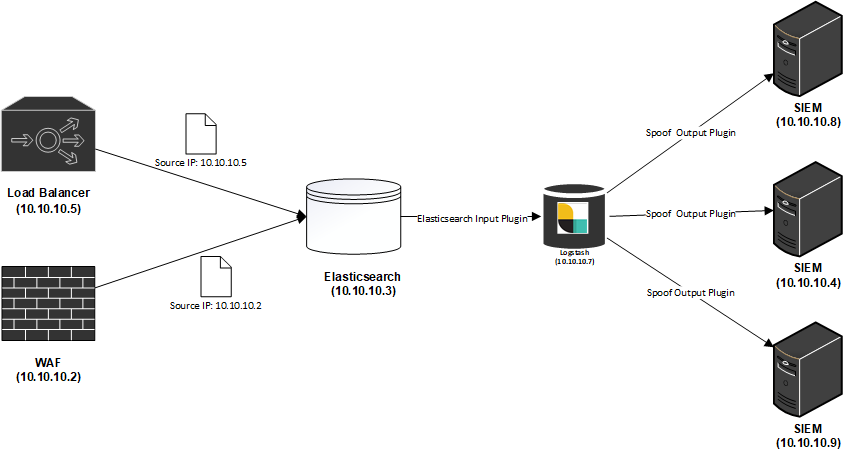
Elasticsearch is commonly used as a centralization point for logs due to its high ingestion capability as well as the extensive libraries of plugins that can be used for collecting, transforming and forwarding almost all types of data. This is especially important for Service Providers who may have a responsibility such as to both store a copy of logs as well as send a copy to customers for their usage in their own SIEM solutions.
Logstash Output Plugin – Spoof
The default UDP Logstash output plugin does not allow for spoofing the source device (IP Address, Port and MAC). I have written a new Logstash output to enable this behavior. The plugin is able to, on every individual message spoof the Source IP, Source Port and Source MAC Address of the packet. To use the plugin you need to specify additional information about the target device:
- Destination MAC Address (This cannot be resolved from the ARP table at this point in time)
- Interface the traffic is intended to be spoofed from
Getting Started
Pre-Requisites
The plugin uses the jnetpcap library and therefore requires a number of pre-requisites on the host to be completed:
- Add jnetpcap library to OS
- Install Plugin
JNetPCAP
It is possible to run the library on different operating systems, I have tested on Ubuntu 18.04. For instructions on how to run it on other operating systems, there are notes in the Release Notes of the library.
After deploying a new Ubuntu Server with the default Logstash installation, complete the following steps:
- Download the jnetpcap library:
wget -O jnetpcap-1.4.r1425 https://downloads.sourceforge.net/project/jnetpcap/jnetpcap/Latest/jnetpcap-1.4.r1425-1.linux64.x86_64.tgz
- Unzip the files
tar -xvf jnetpcap-1.4.r1425
- Copy the library to the /lib folder
cp jnetpcap-1.4.r1425/libjnetpcap.so /lib/
- Install libpcap-dev (Ubuntu)
sudo apt-get install libpcap-dev
Note: Using Centos, the package is only available via the RHEL optional channel.
Note: If you are running logstash as a service, the default permissions for the logstash user are not sufficient, run the service as root (If anyone knows the exact permissions to harden please DM me).
This can be done by editing /etc/systemd/system/logstash.service if you are using systemctl.
Installing the plugin
You can download the source code and build the code yourself. Alternatively you can download the gem directly from here.
- Move to the logstash folder
cd /usr/share/logstash
- Install the plugin
./bin/logstash-plugin install --no-verify <path-to-gem>/logstash-output-spoof-0.1.0.gem
Testing the plugin
- Create a test pipeline to test
vi /usr/share/logstash/test.conf
- Copy the following pipeline into the file
Note: Remember to replace the values marked to be replaced
input {
  generator { message => "Hello world!" count => 1 }
}
filter {
  mutate {
   add_field => {
      "extra_field" => "this is the test field"
      "src_host" => "3.3.3.3"
   }
   update => {"message" => "this should be the new message"}
  }
}
output {
  spoof {
    dest_host => "<REPLACE WITH YOUR DESTINATION IP>"
    dest_port => "<REPLACE WITH YOUR DESTINATION PORT>"
    src_host => "%{src_host}"
    src_port => "2222"
    dest_mac =>  "<REPLACE WITH YOUR DESTINATION MAC ADDRESS>"
    src_mac => "<REPLACE WITH YOUR MAC ADDRESS>"
    message => "%{message}"
    interface => "ens32"
  }
}
- On the DESTINATION device, you can run tcpdump to collect and observe the traffic
sudo tcpdump -A -i any src 3.3.3.3 -v
Note: You may need to install tcpdump
- On the server hosting the logstash from the /usr/share/logstash path, start the pipeline
./bin/logstash -f test.conf
Note: Be patient, Logstash is very slow to start up
On the target system you are capturing traffic from you should see the source of the packet is coming from 3.3.3.3! Congratulations on spoofing your first message.

Conclusion
In this post I have demonstrated how you can use the new Logstash Plugin to spoof traffic, as this can be done using event based data this plugin can be used to support many exotic deployment topologies that are SIEM compliant.
Using this plugin, hopefully you can support complex log forwarding topologies regardless of what technologies the end device uses.
