Something not talked about frequently are topics such as the risks quantum computing have on modern forms of authentication/authorization. Most modern authentication/authorization frameworks (such as OpenIDConnect) rely on JWT Tokens and signing algorithms that are not quantum resistant. Once broken, attackers could functionally gain access to the front door by signing their own tokens to impersonate users on any of these systems. More worryingly is the fact that most systems use a single signer which means the encryption exploit can be reused to impersonate any user on that system.
Good news! NIST (National Institute of Standards and Technology) have been hard at work in evolving the backbone of digital freedom. From that very difficult work a number of algorithms have been selected for the future standards .
For digital signatures CRYSTALS-Dilithium, FALCON and SPHINCS+ was selected.
For encryption CRYSTALS-Kyber was selected.
What could this mean for us code monkeys on the ground building the internet backbone as we string together defensive middleware, layer hashing algorithms into our db and implement E2E client communication to fend off the hackers? This series looks to explore the implications and how the technology used commonly today will change. We will look at C# and RUST example test implementations of authentication and data protection practices in the post quantum age!
A example of what we will explore, a JWT authenticated API implementing Dilithium3.
]]>Introduction
Although Bitcoin, Ethereum and the general concept of Cryptocurrency is much more widespread then when I got into it, I am still surprised to find how difficult it is for my friends and family to get started. Whether they have to create paper wallets via myetherwallet.com and having to save their seed to a password manager (or for the less tech savy to a text file on their desktop) or trying to use Ledger the experience feels alien compared to pretty much every other software ecosystem.
CAuth2.0 is my proposal to solve this issue. The original goal was to create a user experience as close to what users commonly experience (email, password, 2FA) but with the same “level” of security as hardware wallets. At a high level the solution utilizes client-side encryption similar to secure password managers but combined with 2FA multi-signature workflows to ensure network security.
You can read the full framework here.
Key access: How does it work?
The framework proposes a client encrypted key storage system that ensures that the service-provider never has access to private keys. This methodology results in users having access to their keys using a Email + Password + Master Password. Admittedly the master password is an additional piece of information users must store however it has a added advantage of being disposable and customizable which is not the same as a seed or private key.
Vault Creation and Key Storage Process

Key Retrieval Process

Two-factor Multi-signature: How does it work?
By using smart-account functionality and a intermediary security layer, users are able to provide authorization for transactions via a second methodology i.e. Email or SMS.
Transaction Broadcasting Communication Flow

Sample Deployment Architecture

Conclusion
By addressing these challenges, users of CAuth2.0 can have a familiar experience for primary authentication/authorization (OAuth2.0) and transaction broadcasting (two-factor confirmations). The proposed framework is compatible with all Smart Account enabled blockchains and can be implemented in a multi-service provider ecosystem.
]]>It is a common requirement to export the data in Elasticsearch for users in a common format such as .csv. An example of this is exporting syslog data for audits. The easiest way to complete this task I have found is to use python as the language is accessible and the Elasticsearch packages are very well implemented.
In this post we will be adapting the full script found here.
1. Prerequisite
To be able to test this script, we will need:
- Working Elasticsearch cluster
- Workstation that can execute .py (python) files
- Sample data to export
Assuming that your Elasticsearch cluster is ready, lets seed the data in Kibana by running:
POST logs/_doc
{
  "host": "172.16.6.38",
  "@timestamp": "2020-04-10T01:03:46.184Z",
  "message": "this is a test log"
}
This will add a log in the "logs" index with what is commonly ingested via logstash using the syslog input plugin.
2. Using the script
2.1. Update configuration values
Now lets adapt the script by filling in our details for lines 7-13

- username: the username for your Elasticsearch cluster
- password: the password for your Elasticsearch cluster
- url: the url of ip address of a node in the Elasticsearch cluster
- port: the transport port for your Elasticsearch cluster (defaults to 9200)
- scheme: the scheme to connect to your Elasticsearch with (defaults to https)
- index: the index to read from
- output: the file to output all your data to
2.2. Customizing the Query
By default the script will match all documents in the index however if you would like to adapt the query you can edit the query block.

Note: By default the script will also sort by the field "@timestamp" descending however you may want to change the sort for your data
2.3. Customizing the Output
Here is the tricky python part! You need to loop through your result and customize how you want to write your data-out. As .csv format uses commas (new column) and new line values (\n) to format the document the default document includes some basic formatting.

1.The output written to the file, each comma is a new column so the written message will look like the following for each hit returned:
| column 1 | column 2 | column 3 |
|---|---|---|
| result._source.host | result._source.@timestamp | result._source.message |
2. Note that when there is a failure to write to the file, it will write the message to a array to print back.
3. At the end of the script, all the failed messages will be re-printed to the user
2.4. Enjoying your hardwork!
Looking at your directory you will see a output.csv now and the contents will look in excel like:

There are situations where from a Docker container, you need to access services on the host machine. An example of this use-case is trying to test pdf-generation using a website hosted in your IDE environment from a container running on the same host pdf-bot.
Summary
From Docker 18.04 on-wards there is a convenient internal DNS Entry (host.docker.internal) accessible from your containers that will resolve to the internal network address of your host from your Docker container’s network.
You can ping the host from within a container by running
ping host.docker.internal
Proof
To test this feature using this guide you will need
- Docker 18.03+ installed
- Internet Access
Steps
Step 1: Run the Docker container using the command
docker run -t -d ubuntu

This will return you the container id, in my case it is a77209ae9b0f11c80ce488eda8631a03e8444af94167fd6a96df5ee2e600da1f
Step 2. Access the container by running
docker exec -it <container id> /bin/bash
e.g. docker exec -it a77 /bin/bash.
Note: you do not need to use full container id, you can use first 3 characters
Step 3. Set up the container
From within the container run the following commands:
Get package lists – apt-get update
Install net-tools – apt-get install net-tools
Install DNS utilities – apt-get install dnsutils
Install iputils-ping –apt-get install iputils-ping

Step 4. Using the DNS Service
There is a dns service running on the containers network default gateway (eth01) that allows you to resolve to the internal IP address used by the host. The DNS name to resolve the host is host.docker.internal.

Step 5. Pinging the host
Ping the host to establish that you have connectivity. You will also be able to see the host IP Address that is resolved.
ping host.docker.internal
note: you should use this internal DNS address instead of IP as the IP address of the host may change.

- Accessing other services on the host
Services on the host should be advertising on either 0.0.0.0 or localhost to be accessible.
e.g. To access a service on the host running on localhost:4200 you can run the following command from within the host.
curl 192.168.65.2:4200
Note that if you use host.docker.internal some web servers will throw "Invalid Host header" errors in which case you either need to disable host header check on your web server or use the IP Address instead of the host name
Summary
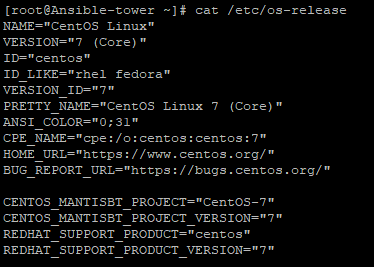
AWX is a web-based task engine built on top of ansible. This guide will walk you through installing AWX on a fresh CentOS7 machine. In this guide Docker is used without Docker-compose and the bare-minimum options were selected to get the application up and running. Please refer to the official guide for more information or options.
Prerequisites
Virtual Machine Specs
- At least 4GB of memory
- At least 2 cpu cores
- At least 20GB of space
- Centos7 Image
Checklist
- Operating System
- [ ] Update OS
- [ ] Install Git
- [ ] Clone AWX
- [ ] Install Ansible
- [ ] Install Docker
- [ ] Install Docker-py
- [ ] Install GNU Make
- Config File
- [ ] Edit Postgres settings
- Build and Run
- [ ] Start Docker
- [ ] Run Installer
- Access AWX
- [ ] Open up port 80
- [ ] Enjoy
1. Operating System
All commands are assumed to be run as root.
If you are not already logged in as root, sudo before getting started
sudo su -
Update OS
-
Make sure your ‘/etc/resolv.conf’ file can resolve dns. Example resolv.conf file
nameserver 8.8.8.8 -
Run
yum updateNote: If you are still unable to run a update you may need to clear your local cache.
yum clean all && yum makecache
Install Git
-
Install Git
yum install git
Clone AWX
-
Make a new directory and change to that directory
cd /usr/local -
Clone the official git repository to the working directory
git clone https://github.com/ansible/awx.gitcd /usr/local/awx
Install Ansible
-
Download and install ansible
yum install ansible
Install Docker
-
Download yum-utils
sudo yum install -y yum-utils \ device-mapper-persistent-data \ lvm2 -
Set up the repository
sudo yum-config-manager \ --add-repo \ https://download.docker.com/linux/centos/docker-ce.repo -
Install the latest version of Docker CE
sudo yum install docker-ce docker-ce-cli containerd.io
Install Docker-py
-
Enable the EPEL repository
yum install epel-release -
Install PIP
yum install python-pip -
Using pip install docker-py
pip install docker-py
Install GNU Make
-
Make should already be included in the OS, this can be verified using
make --versionIf it has not been installed you can run
yum install make
2. Config File
Edit Postgres Settings
Note: We will persist the PostgresDB to a custom directory.
-
Make the directory
mkdir /etc/awxmkdir /etc/awx/db -
Edit the inventory file
vi /usr/local/awx/installer/inventoryFind the entry that says "#postgres_data_dir" and replace it with
postgres_data_dir=/etc/awx/dbSave changes
Note: As of 12/03/2019, there is a bug running with docker, to overcome the bug you need to find in the inventory "#pg_sslmode=require" and replace it with
pg_sslmode=disable
3. Build
Start docker
-
Start the docker service
systemctl start docker
Run installer
-
Change to the right path
cd /usr/local/awx/installer/ -
Run the installer
ansible-playbook -i inventory install.ymlNote: You can track progress by running
docker logs -f awx_task

4. Access AWX
Open up port 80
-
Check if firewalld is turned on, if it is not it is recommended
To check:
systemctl status firewalldTo start:
systemcl start firewalld -
Open up port 80
firewall-cmd --permanent --add-port=80/tcpfirewall-cmd --reload
Enjoy
-
You can now browse your host IP and access and enjoy "http://<your host ip>"!
Note: Default username is "admin" and password is "password"
If you are currently developing using C# (Particularly .NET Core 2.0+) here are some shortcuts I hope will be able to save you time I wish I could have back.
There is official documentation for C# Elasticsearch development however I found the examples to be quite lacking. I do recommend going through the documentation anyway especially for the NEST client as it is essential to understand Elasticsearch with C#.
1. Low Level Client
“The low level client,
ElasticLowLevelClient, is a low level, dependency free client that has no opinions about how you build and represent your requests and responses.”
Unfortunately the low level client in particular has very sparse documentation especially examples. The following was discovered through googling and painstaking testing.
1.1. Using JObjects in Elasticsearch
JObjects are quite popular way to work with JSON objects in .NET, as such it may be required to parse JObjects to Elasticsearch, this may be a result of one of the following:
- Definition of the object is inherited from a different system and only parsed to Elasticsearch via your application (i.e. micro-service)
- Too lazy to strongly define each object as it is unnecessary
The JObject cannot be used as the generic for indexing as you will receive this error:
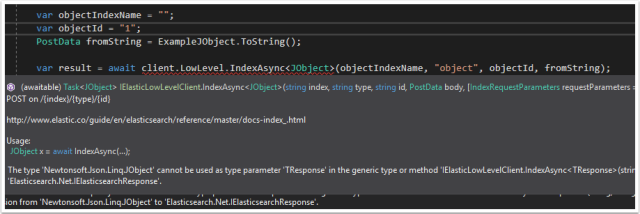
Instead use “BytesResponse” as the <T> Class

1.2. Running a “Bool” query
The examples given by the Elasticsearch documentation does not give an example of a bool query using the low-level client. Why is the “Bool” query particularly difficult? Using Query DSL in C#, “bool” will automatically resolve to the class and therefore will throw a error:
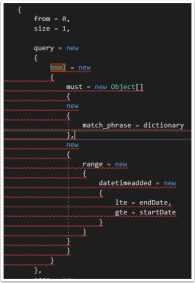
Not very anonymous type friendly… the solution to this one is quite simple, add a ‘@’ character in-front of the bool.
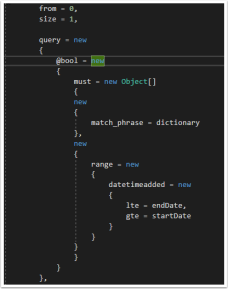
1.3. Defining Anonymous Arrays
This one seems a-bit obvious but if you want to define an array for use with DSL, use the anonymous typed Array (Example can be seen in figure 4) new Object[].
1.4. Accessing nested fields in searches
Nested fields in Elasticsearch are stored as a full path, . delimited string. This creates a problem when trying to query that field specifically as it creates a invalid type for anonymous types.
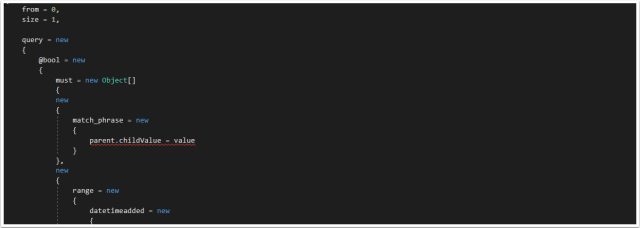
The solution is to define a Dictionary and use the dictionary in the anonymous type.
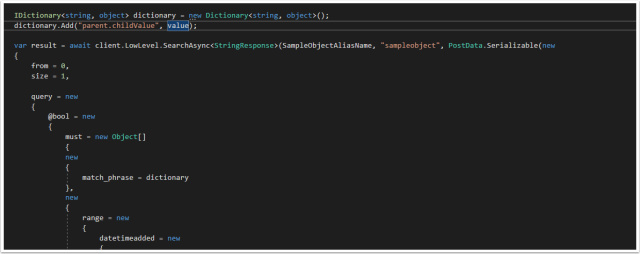
The Dictionary can be passed by the anonymous type and will successfully query the Nested field in Elasticsearch.
2. NEST Client
“The high level client,
ElasticClient, provides a strongly typed query DSL that maps one-to-one with the Elasticsearch query DSL.”
The NEST documentation is much more comprehensive, the only issue I found was using keyword Term searches.
2.1. Using Keyword Fields
All string fields are mapped by default to both text and keyword, the documentation can be found here. Issue is that in the strong typed object used in the Elastic Mapping there is no “.keyword” field to reference therefore a error is thrown.
Example:
For the Object:
public class SampleObject

{

public string TextField { get; set; }

}
Searching would look like this

Unfortunately the .Keyword field does not exist, the solution is using the .Suffix function using property name inference. This is documented in the docs however it is not immediately apparent that is how you access “keyword”.

I hope this post was helpful and saved you some time. If you have any tips of your own please comment below!
]]>
Let’s quickly do a checklist of what we have so far
- SSH Accessible Virtual Machine (Running Centos 7.4)
- Ports 22, 443, 80 are open on the virtual machine
- Domain pointed at the public IP of the Virtual machine
- SSL Certificate generated on the virtual machine
- Docker CE installed on the virtual machine
If you have not completed the steps above, review part 1 and part 2.
Deploying the Final Stack
SSH into the virtual machine and swap to the root user.
Move to the root directory of the machine (Running cd /)
Creating our directories
Create two directories (This is done for simplicity)
- certs – This will be used to store the SSL certificates to be used in our NGINX container
Mkdir /certs
- docker – This will be used to store our docker related files (docker-compose.yml
Mkdir /docker
Swap to the docker directory
cd /docker
Create a docker compose file with the following content (It is case and space sensitive, read more about docker compose).
Moving and renaming our SSL Certificates
Unfortunately, Nginx-Proxy must read the SSL certificates as <domain name>.crt and the key as <domain name>.key. as such we need to move and rename the original certificates generated for our domain.
Run the following commands to copy the certificates to the relevant folders and rename:
cp /etc/letsencrypt/live/<your domain>/fullchain.pem /certs/<your domain>.crt
cp /etc/letsencrypt/live/<your domain>/privkey.pem /certs/<your domain>.key
Creating a docker-compose.yml file
The docker compose file will dictate our stack.
Run the following command to create the file at /docker/docker-compose.yml
vi /docker/docker-compose.yml
Populate the file with the following content
Line by line:
version: "3.3"
services:
  nginx-proxy:
    image: jwilder/nginx-proxy #nginx proxy image
    ports:
      - "443:443"  #binding the host port 443 to container 443 port
    volumes:
      - /var/run/docker.sock:/tmp/docker.sock:ro
      - /certs:/etc/nginx/certs #Mounting the SSL certificates to the image
    networks:
     -  webnet
  visualizer:
    image: dockersamples/visualizer:stable
    volumes:
      - "/var/run/docker.sock:/var/run/docker.sock"
    environment:
      - VIRTUAL_HOST=<Your DOMAIN ie. domain.com.au>
networks:
  - webnet
environment:
– VIRTUAL_HOST=<your domain ie. Domain.com.au>
networks:
webnet:
Save the file by press esc than :wq
Starting the stack
Start docker
systemctl start docker
Pull the images
docker pull jwilder/nginx-proxy:latest
docker pull dockersamples/visualizer
Start the swarm
docker swarm init
Deploy the swarm
docker stack deploy -c /docker/docker-compose.yml test-stack
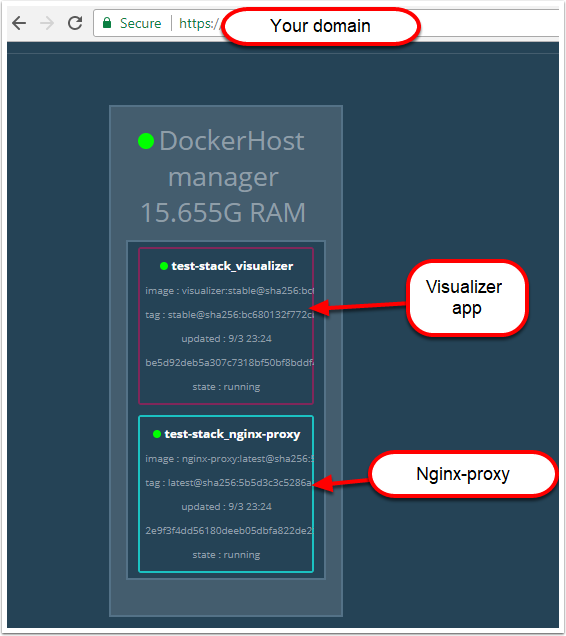
Congratulations! If you have done everything right you should now have a SSL protected visualizer when you browse https://<your domain>
Troubleshooting
To troubleshoot any problems check all services have a running container by running
docker service ls

Check the replicas count. If the nginx image is not running, check that the mounted .certs path does exist.
If the nginx container is running, you can run
docker service <service Id> logs --follow
then try access the https://<your domain> and see whether the connection is coming through.
- If it is than check the environment variable in your docker-compose
- If it is not than check that the port 443 is open and troubleshoot connectivity to the server
One of the greatest motivations for me is seeing the current open-source projects. It is amazing to be apart of a community that truly transcends race, age, gender, education that culminates in the development of society changing technologies, it is not difficult to be optimistic about the future.
With that, lets deploy a containerized application behind a Nginx Reverse Proxy with a free SSL encrypted. This entire deployment will only cost you a domain.
Technologies Used
The technologies used in this series are:
Architecture
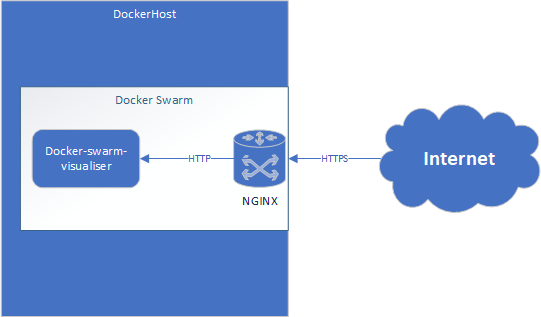
Getting Started
To start, I would advise signing up to a Azure trial . This will help you get started without any hassle.
If you have your own hosted VM or are doing a locally hosted docker stack please feel free to skip this part and move onto part 2.
Deploying the Virtual Machine
Select the image
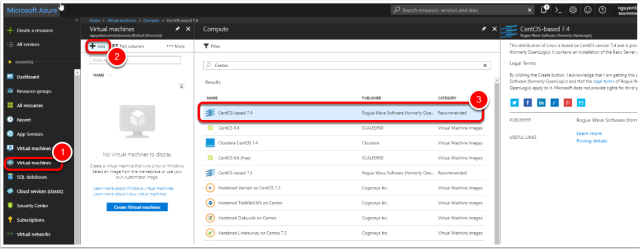
- In the side menu press Virtual Machines
- Press “Add”
- Select the “CentOS-based 7.4” image
- Press “Ok”
Note: Technically you can use any image that can run docker.
Configure the machine
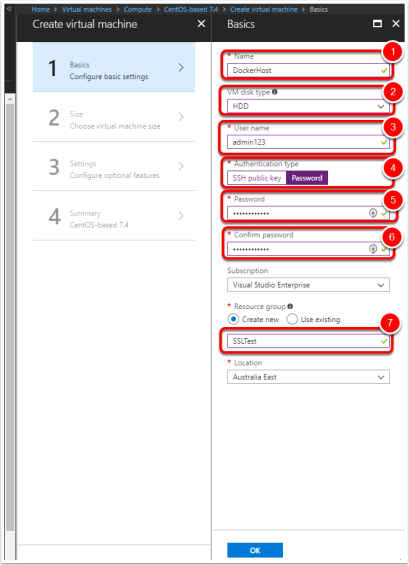
- Name the VM – ie. DockerHost
- Change disk type to HDD (To save credit)
- Set the username
- Change authentication type to password for simplicity
- Set the password
- Confirm the password
- Create a new Resource Group (Such as SSLTest)
Select Machine Size
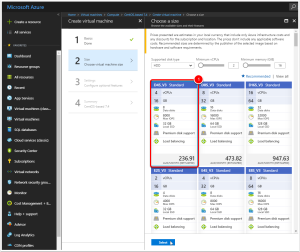
- Select a machine size, I chose the D4S_V3 (4 vCPUs, 16GB) however any image with 2 or more vCPUs and more than 8GB of RAM is sufficient.
Virtual Machine Settings
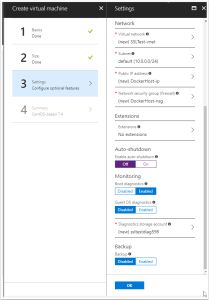
You can leave default settings for the settings. (I switched off auto-shutdown).
Note: Make sure public IP address has been enabled
Wait for the Virtual Machine to finishing deploying…
Configuring DNS
Find the public IP address
After the machine has been successfully configured, browse to the virtual machine in Azure and get the public IP.
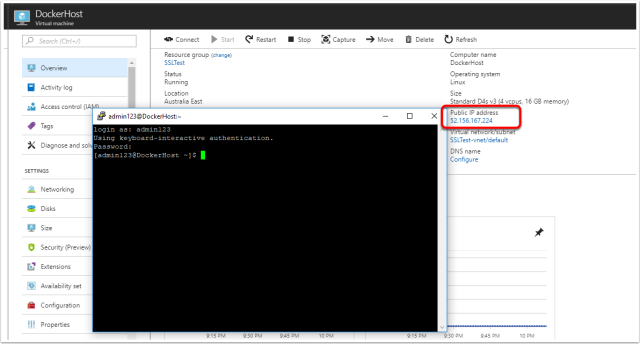
Create the TXT file
Log onto your domain provide (i.e. godaddy.com) and create a TXT file to point your domain address to the newly created VM.

Do a simple “nslookup <domain>” till you can confirm that the domain has been updated.
Opening up ports 443, 80, 22
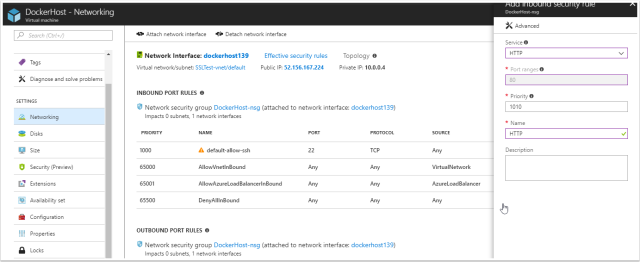
Browse to the virtual machine and browse to “Networking” in Azure. The following ports need to be allowed for inbound traffic
443 – This will be used to receive the SSL protected HTTPS requests
80 – This will be used temporarily to recieve your SSL certificate
22 – This should be open already however if it isn’t, allow 22 traffic for SSH connections.
SSH into the VM and allow root access (Dev only)
Using putty if you are on windows or just terminal on a Mac or Linux workstation, attempt to SSH into the machine.
After successfully logging in (Using the specified credentials when creating the VM), enable the root user for ease of use for the purpose of this tutorial (Do not do this for production environments).
This can be done by running
sudo passwd root
Specify the new root password
Confirm the root password
Congratulations you have completed part 1 of this tutorial, now that you have a virtual machine ready, let move on to part 2.
]]>- Distributed Architecture is the “bees knees” in web technology (scalability, dependency management & service management)
- Stateless communication is ideal for single page applications as view generation logic is completely separate from application data logic.
- Authentication is required on every request in stateless communication
- Identity can be shared between applications
- Users want to experience Single-Sign-On especially in enterprise
Why the why?!
This post will be exploring the required understanding to derive the why of what we will be building in the next few weeks. Without a “WHY”, even with a “WHAT” and “HOW” the learning becomes meaningless. Armed with a “WHY” I genuinely believe even without touching a piece of code, project managers, technical operations and even the everyday user can benefit from understanding the goal of this series.
Modern Software Architecture
In modern web-based technology, distributed architecture is key.
Distributed architecture has 3 key functions:
- Clearly defined dependencies
- Efficient scaling
- Re-usable components
No area does this hold more true for than in “Identity”. A user can be thought of as a persistent record (Or partial record) not only within a entire app but also across different apps. The question “Identity” aims to answer (to your app) is the same question your pubescent self once tried to answer:
WHO AM I?!
To explore how this can be answered we first need to understand the two basic forms of communication between server-client communication.
- Stateful
- Stateless
1. Stateful Communication
Stateful: The state of interaction is recorded therefore the context of communication can be derived not only from the information sent from client to server but also from previously established state.
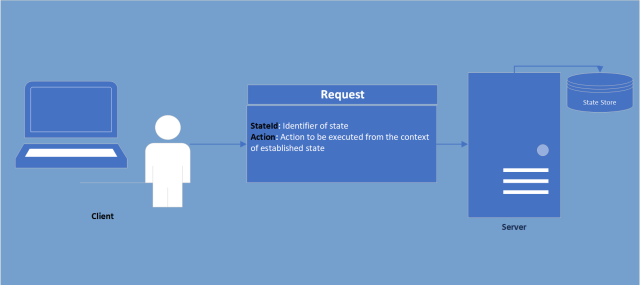
Why use stateful communication?
In some web-frameworks (Such as .NET MVC) UI rendering is done statically via generation of the source code (HTML, CSS & JavaScript) on server-side which is than sent to client-side. In the event of a partial re-render (Good example being filtering on a table) the server would require a understanding of what has previously been rendered to prevent unnecessary communication (Only sending to the client the new section not the entire page). This understanding or “State” is therefore stored on server and after establishment, all the client would need to do use this established state is send a reference.
As apart of this state-management you can also store the identity of the user and therefore handle security based on this state.
Why this is not my recommended approach.
- Stateful communication is managed differently in different technologies, therefore it makes multi-technology environments difficult to develop and maintain (I.e. web-app + iOS app)
- If identity is only maintained by client-server state, it makes it much more difficult (close to impossible) to create a smooth SSO experience
- Communication is much more complicated as to understand the communication you also need to understand the state stored on server (Complicating debugging and unit testing).
Time and place
At university most my courses was learning stateful communication based technology (.NET 4.5, JSP, JSF etc…) but upon learning about single page applications I could immediately understand the weaknesses of stateful communication. Without the requirement of server-side view generation, the benefits of stateful communication (admittedly there are some) do not outweigh the negatives. If you have a scenario where stateful communication is preferable (maybe a high-frequency polling web-application where the security verification overhead of communication would be too high in stateless communication) I am keen to discuss and please comment below.
2. Stateless Communication
Stateless: The state of interaction is not-recorded beyond the request. All required context must be derived from the request sent.
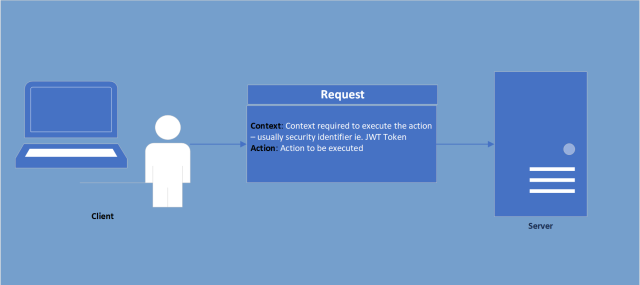
Why this is my recommended approach.
By never assuming state
- request management is clear and very well scoped
- following a request is as simply as sending the same request a second time
- communication can be framed in a well-known multi-technology format (Such as the RESTFul architecture)
Terms and conditions apply.
Just with almost everything in life there is a compromise in stateless communication. As there is no state, every request needs to be separately authorized and validated. This would not be ideal if we were doing server-side rendering (Imagine having to re-authorize every resorting of a table! The horror!). Thankfully this has been largely solved through modern UI SPA (Single page application such as Angular or React (To be continued in another post)) frameworks where client-server communication is separated between UI Logic and Application-data Logic, therefore only application-data requests would need to be authenticated (Much more tolerable).
Identity
Hopefully by now you agree (Or disagree but commented) as to why we will be using stateless communication. Without a state however how will you be able to identify yourself to the application? Very simply, we need to send with our request a identification token (Or cookie) to ensure that the application server will take our request appropriately.
Simple enough? Now ask yourself… Why can’t we use that identification token between applications?! If my name is Tony on Facebook, why wouldn’t it be Tony on LinkedIn? The answer to this question is ABSOLUTELY we can use the same identification token, this rings true especially in Enterprise environments where your real identity matches your application identities.
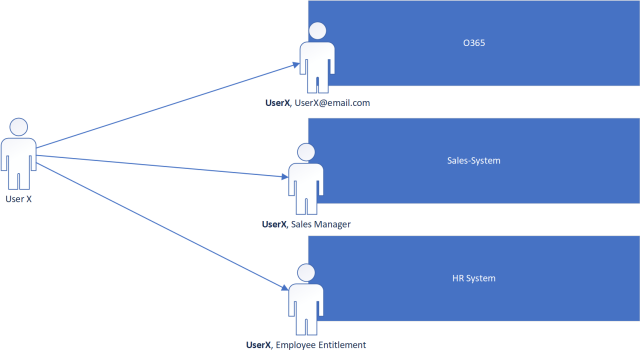
As depicted above, the “UserX” component of the application’s user identity is the same in every system therefore the UserX should be able to log into all 3 systems with the same identity. Each application than should be able to resolve the user independently and add on its own application specific Identity information (ie. Sales Manager, Employee Entitlement Id etc.).
Case and Point
This is the holy grail of UX. Ever use your google account to log into Dropbox? Or use Facebook to log into Instagram?! This is the “WHY” of this series. After this series, not only should you know how to authenticate your own Web-API with a existing identity provider (In this series we will explore OpenID Connect) but to build your own scalable “Identity Provider” ready to be used by ALL the applications you wish to share a Identity across.
Why we externalize the identity provider from our application is quite simple when looking at the diagram above. If we created a centralized identity based on another applications identity such as O365’s user identity (Which is possible), anytime O365 is taken offline, all your other applications would cease to be able to authenticate users (causing 100 help desks tickets and many upset users.) As such we separate the identity providing service as it is a super-dependency (Highest level dependency). There are product suites that do this separation for you.
The two I would recommend are AzureAD or Okta
AzureAD: https://docs.microsoft.com/en-us/azure/active-directory/active-directory-whatis
Okta: https://www.okta.com/products/it/
In this series though we will be building this ourselves using Identity Server 4, Docker, Reddis, PostGRE and more because even if in production you want to “pay to make it go away” I believe there is still a educational experience to be had and all technology I will be using is either free or has a free community version.
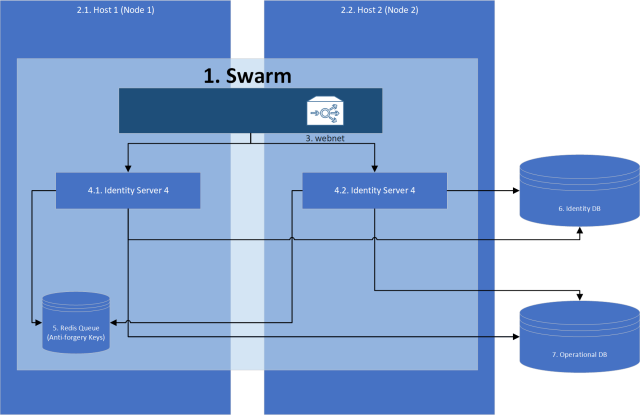
Bonus for getting to the end (Starting architecture we will be building ;)).
