Summary
AWX is a web-based task engine built on top of ansible. This guide will walk you through installing AWX on a fresh CentOS7 machine. In this guide Docker is used without Docker-compose and the bare-minimum options were selected to get the application up and running. Please refer to the official guide for more information or options.
Prerequisites
Virtual Machine Specs
- At least 4GB of memory
- At least 2 cpu cores
- At least 20GB of space
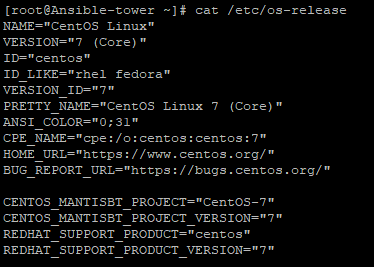
- Centos7 Image
Checklist
- Operating System
- [ ] Update OS
- [ ] Install Git
- [ ] Clone AWX
- [ ] Install Ansible
- [ ] Install Docker
- [ ] Install Docker-py
- [ ] Install GNU Make
- Config File
- [ ] Edit Postgres settings
- Build and Run
- [ ] Start Docker
- [ ] Run Installer
- Access AWX
- [ ] Open up port 80
- [ ] Enjoy
1. Operating System
All commands are assumed to be run as root.
If you are not already logged in as root, sudo before getting started
sudo su -
Update OS
-
Make sure your ‘/etc/resolv.conf’ file can resolve dns. Example resolv.conf file
nameserver 8.8.8.8 -
Run
yum updateNote: If you are still unable to run a update you may need to clear your local cache.
yum clean all && yum makecache
Install Git
-
Install Git
yum install git
Clone AWX
-
Make a new directory and change to that directory
cd /usr/local -
Clone the official git repository to the working directory
git clone https://github.com/ansible/awx.gitcd /usr/local/awx
Install Ansible
-
Download and install ansible
yum install ansible
Install Docker
-
Download yum-utils
sudo yum install -y yum-utils \ device-mapper-persistent-data \ lvm2 -
Set up the repository
sudo yum-config-manager \ --add-repo \ https://download.docker.com/linux/centos/docker-ce.repo -
Install the latest version of Docker CE
sudo yum install docker-ce docker-ce-cli containerd.io
Install Docker-py
-
Enable the EPEL repository
yum install epel-release -
Install PIP
yum install python-pip -
Using pip install docker-py
pip install docker-py
Install GNU Make
-
Make should already be included in the OS, this can be verified using
make --versionIf it has not been installed you can run
yum install make
2. Config File
Edit Postgres Settings
Note: We will persist the PostgresDB to a custom directory.
-
Make the directory
mkdir /etc/awxmkdir /etc/awx/db -
Edit the inventory file
vi /usr/local/awx/installer/inventoryFind the entry that says "#postgres_data_dir" and replace it with
postgres_data_dir=/etc/awx/dbSave changes
Note: As of 12/03/2019, there is a bug running with docker, to overcome the bug you need to find in the inventory "#pg_sslmode=require" and replace it with
pg_sslmode=disable
3. Build
Start docker
-
Start the docker service
systemctl start docker
Run installer
-
Change to the right path
cd /usr/local/awx/installer/ -
Run the installer
ansible-playbook -i inventory install.ymlNote: You can track progress by running
docker logs -f awx_task

4. Access AWX
Open up port 80
-
Check if firewalld is turned on, if it is not it is recommended
To check:
systemctl status firewalldTo start:
systemcl start firewalld -
Open up port 80
firewall-cmd --permanent --add-port=80/tcpfirewall-cmd --reload
Enjoy
-
You can now browse your host IP and access and enjoy "http://<your host ip>"!
Note: Default username is "admin" and password is "password"
Let’s quickly do a checklist of what we have so far
- SSH Accessible Virtual Machine (Running Centos 7.4)
- Ports 22, 443, 80 are open on the virtual machine
- Domain pointed at the public IP of the Virtual machine
- SSL Certificate generated on the virtual machine
- Docker CE installed on the virtual machine
If you have not completed the steps above, review part 1 and part 2.
Deploying the Final Stack
SSH into the virtual machine and swap to the root user.
Move to the root directory of the machine (Running cd /)
Creating our directories
Create two directories (This is done for simplicity)
- certs – This will be used to store the SSL certificates to be used in our NGINX container
Mkdir /certs
- docker – This will be used to store our docker related files (docker-compose.yml
Mkdir /docker
Swap to the docker directory
cd /docker
Create a docker compose file with the following content (It is case and space sensitive, read more about docker compose).
Moving and renaming our SSL Certificates
Unfortunately, Nginx-Proxy must read the SSL certificates as <domain name>.crt and the key as <domain name>.key. as such we need to move and rename the original certificates generated for our domain.
Run the following commands to copy the certificates to the relevant folders and rename:
cp /etc/letsencrypt/live/<your domain>/fullchain.pem /certs/<your domain>.crt
cp /etc/letsencrypt/live/<your domain>/privkey.pem /certs/<your domain>.key
Creating a docker-compose.yml file
The docker compose file will dictate our stack.
Run the following command to create the file at /docker/docker-compose.yml
vi /docker/docker-compose.yml
Populate the file with the following content
Line by line:
version: "3.3"
services:
  nginx-proxy:
    image: jwilder/nginx-proxy #nginx proxy image
    ports:
      - "443:443"  #binding the host port 443 to container 443 port
    volumes:
      - /var/run/docker.sock:/tmp/docker.sock:ro
      - /certs:/etc/nginx/certs #Mounting the SSL certificates to the image
    networks:
     -  webnet
  visualizer:
    image: dockersamples/visualizer:stable
    volumes:
      - "/var/run/docker.sock:/var/run/docker.sock"
    environment:
      - VIRTUAL_HOST=<Your DOMAIN ie. domain.com.au>
networks:
  - webnet
environment:
– VIRTUAL_HOST=<your domain ie. Domain.com.au>
networks:
webnet:
Save the file by press esc than :wq
Starting the stack
Start docker
systemctl start docker
Pull the images
docker pull jwilder/nginx-proxy:latest
docker pull dockersamples/visualizer
Start the swarm
docker swarm init
Deploy the swarm
docker stack deploy -c /docker/docker-compose.yml test-stack
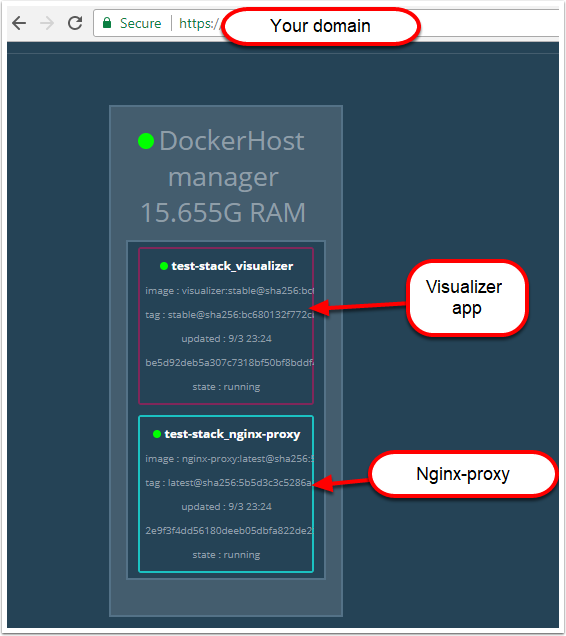
Congratulations! If you have done everything right you should now have a SSL protected visualizer when you browse https://<your domain>
Troubleshooting
To troubleshoot any problems check all services have a running container by running
docker service ls

Check the replicas count. If the nginx image is not running, check that the mounted .certs path does exist.
If the nginx container is running, you can run
docker service <service Id> logs --follow
then try access the https://<your domain> and see whether the connection is coming through.
- If it is than check the environment variable in your docker-compose
- If it is not than check that the port 443 is open and troubleshoot connectivity to the server
One of the greatest motivations for me is seeing the current open-source projects. It is amazing to be apart of a community that truly transcends race, age, gender, education that culminates in the development of society changing technologies, it is not difficult to be optimistic about the future.
With that, lets deploy a containerized application behind a Nginx Reverse Proxy with a free SSL encrypted. This entire deployment will only cost you a domain.
Technologies Used
The technologies used in this series are:
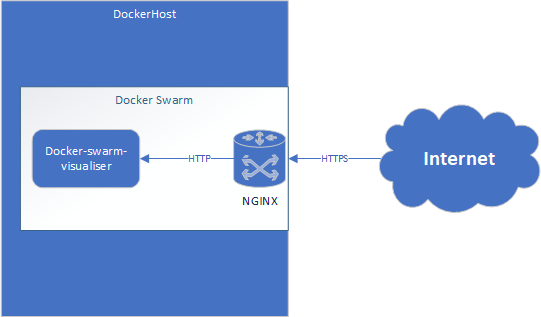
Architecture
Getting Started
To start, I would advise signing up to a Azure trial . This will help you get started without any hassle.
If you have your own hosted VM or are doing a locally hosted docker stack please feel free to skip this part and move onto part 2.
Deploying the Virtual Machine
Select the image
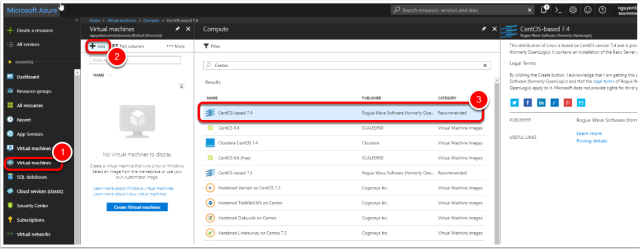
- In the side menu press Virtual Machines
- Press “Add”
- Select the “CentOS-based 7.4” image
- Press “Ok”
Note: Technically you can use any image that can run docker.
Configure the machine
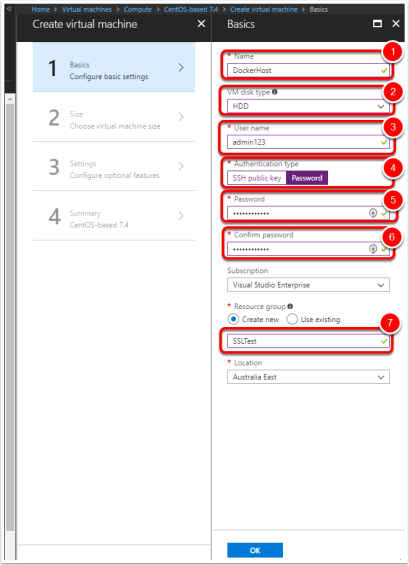
- Name the VM – ie. DockerHost
- Change disk type to HDD (To save credit)
- Set the username
- Change authentication type to password for simplicity
- Set the password
- Confirm the password
- Create a new Resource Group (Such as SSLTest)
Select Machine Size
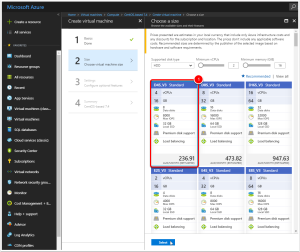
- Select a machine size, I chose the D4S_V3 (4 vCPUs, 16GB) however any image with 2 or more vCPUs and more than 8GB of RAM is sufficient.
Virtual Machine Settings
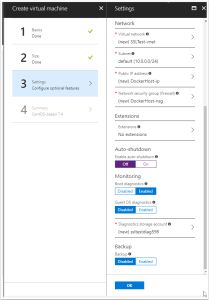
You can leave default settings for the settings. (I switched off auto-shutdown).
Note: Make sure public IP address has been enabled
Wait for the Virtual Machine to finishing deploying…
Configuring DNS
Find the public IP address
After the machine has been successfully configured, browse to the virtual machine in Azure and get the public IP.
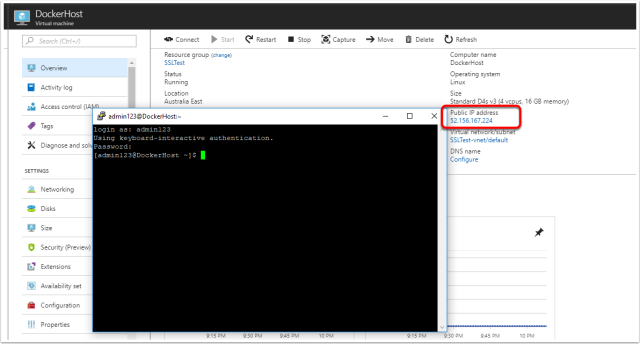
Create the TXT file
Log onto your domain provide (i.e. godaddy.com) and create a TXT file to point your domain address to the newly created VM.

Do a simple “nslookup <domain>” till you can confirm that the domain has been updated.
Opening up ports 443, 80, 22
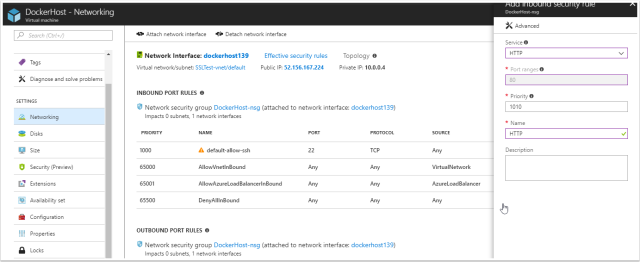
Browse to the virtual machine and browse to “Networking” in Azure. The following ports need to be allowed for inbound traffic
443 – This will be used to receive the SSL protected HTTPS requests
80 – This will be used temporarily to recieve your SSL certificate
22 – This should be open already however if it isn’t, allow 22 traffic for SSH connections.
SSH into the VM and allow root access (Dev only)
Using putty if you are on windows or just terminal on a Mac or Linux workstation, attempt to SSH into the machine.
After successfully logging in (Using the specified credentials when creating the VM), enable the root user for ease of use for the purpose of this tutorial (Do not do this for production environments).
This can be done by running
sudo passwd root
Specify the new root password
Confirm the root password
Congratulations you have completed part 1 of this tutorial, now that you have a virtual machine ready, let move on to part 2.
]]>