Something not talked about frequently are topics such as the risks quantum computing have on modern forms of authentication/authorization. Most modern authentication/authorization frameworks (such as OpenIDConnect) rely on JWT Tokens and signing algorithms that are not quantum resistant. Once broken, attackers could functionally gain access to the front door by signing their own tokens to impersonate users on any of these systems. More worryingly is the fact that most systems use a single signer which means the encryption exploit can be reused to impersonate any user on that system.
Good news! NIST (National Institute of Standards and Technology) have been hard at work in evolving the backbone of digital freedom. From that very difficult work a number of algorithms have been selected for the future standards .
For digital signatures CRYSTALS-Dilithium, FALCON and SPHINCS+ was selected.
For encryption CRYSTALS-Kyber was selected.
What could this mean for us code monkeys on the ground building the internet backbone as we string together defensive middleware, layer hashing algorithms into our db and implement E2E client communication to fend off the hackers? This series looks to explore the implications and how the technology used commonly today will change. We will look at C# and RUST example test implementations of authentication and data protection practices in the post quantum age!
A example of what we will explore, a JWT authenticated API implementing Dilithium3.
]]>Let’s quickly do a checklist of what we have so far
- SSH Accessible Virtual Machine (Running Centos 7.4)
- Ports 22, 443, 80 are open on the virtual machine
- Domain pointed at the public IP of the Virtual machine
If you have not done these things, you can deploy your virtual machine following the steps in part 1.
Preparing the Host
Start this part by initializing a SSH session into the virtual machine.
Swap to the root user by running
su root
Installing Docker
Install docker
On the virtual machine that you have deployed run the following commands:
sudo yum install -y yum-utils device-mapper-persistent-data lvm2
sudo yum-config-manager --add-repo https://download.docker.com/linux/centos/docker-ce.repo
sudo yum install docker-ce
Note: These are the quick commands to install docker, for more information as to what they do exactly visit the docs.
Downloading CertBot
Certbot is a nifty client that will fetch SSL/TLS certificates and is used as the client for Let’s Encrypt.
Download Cert Bot
Pre-requisites:
yum -y install yum-utils
yum install epel-release
Run installation:
sudo yum install certbot
Note: These are the quick commands to install certbot, for more information as to what they do exactly visit the docs.
Generating a SSL Certificate
On the virtual machine that you have deployed run the following commands:
When running certbot to obtain a SSL certificate, too many attempts will result in a lockout of the domain of up to a hour. To prevent a lockout we will be testing the creation of the certificate with a –staging command.
sudo certbot certonly --staging
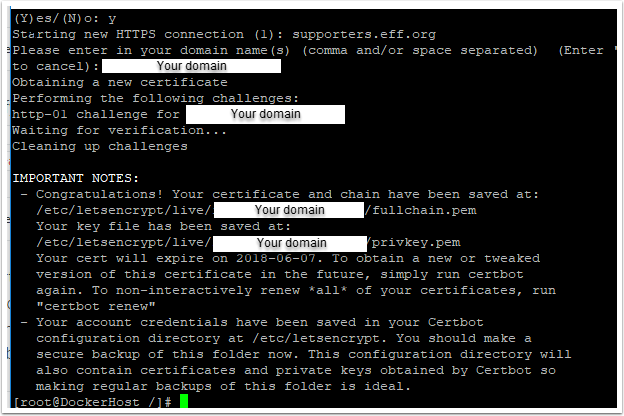
Run through the prompts and at the very end enter your domain address (domain.com.au).
The successful output is shown below

Once you can confirm that a staging certificate can be generated, run the process again without the --staging tag.
Once you have completed the deployment of a production ready SSL certificate, you can now move on to part 3.
]]>